Update Your Username Game: How to Rename System Administrator in Windows 11 with Ease

Update Your Username Game: How to Rename System Administrator in Windows 11 with Ease
Quick Links
- Change the Administrator Name Using the Settings App
- Change the Administrator Name Using the Control Panel
- Change the Administrator Name Using the Netplwiz Command
- Change the Administrator Name Using Command Prompt
Key Takeaways
- To change your administrator name when using a Microsoft account, open the Settings app and navigate to Accounts > Your info > Accounts. Then, in the Microsoft account page, click the “Your info” option in the top bar and then click “Edit name”. Enter your first and last name and click “Save”.
- To change the administrator name in a local account, open Control Panel, go to User Accounts > User Accounts > Change your account name. Then, type the new name in the name field and click the “Change Name” button to save the changes.
Didn’t choose a unique administrator name when you set up your computer, but now you want to add a personal touch? Windows makes it easy to change the administrator name. Here are four quick ways to change the administrator name on Windows 11.
1. Change the Administrator Name Using the Settings App
If you’re signed in with a Microsoft account instead of a local account, you can change your name using the link in the Accounts window of the Settings app. To do that, press Windows+i to open the Settings app . Then, go to Accounts > Your info > Accounts.
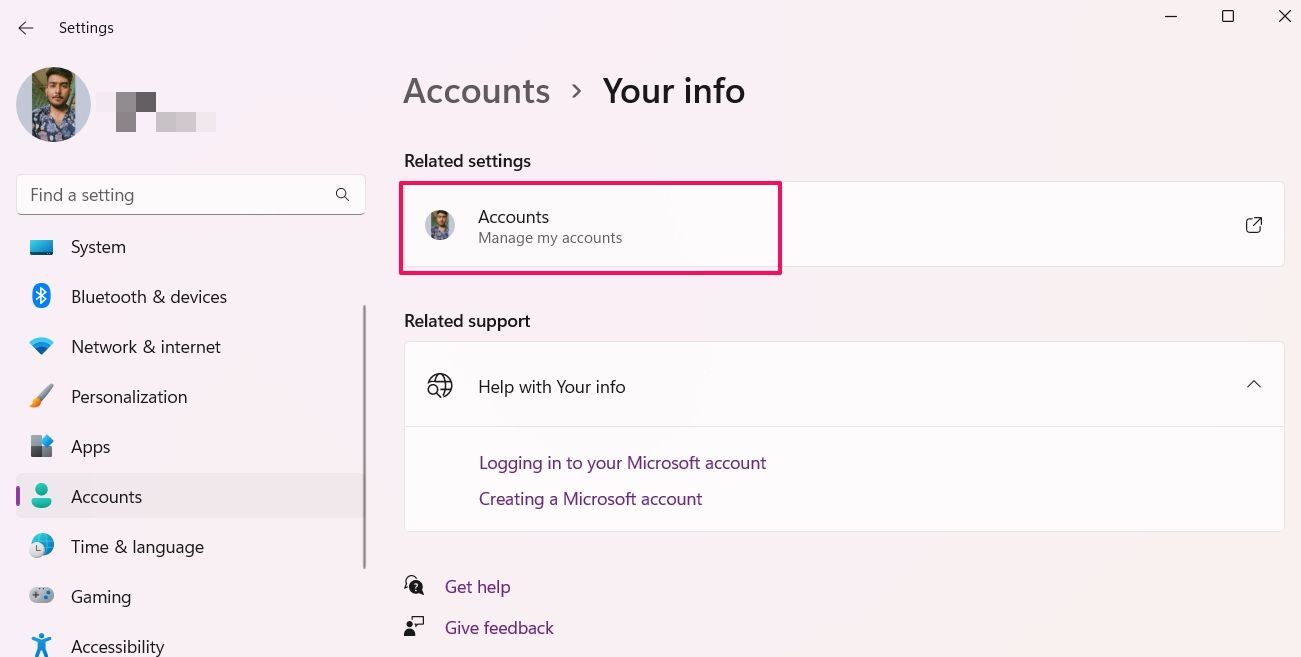
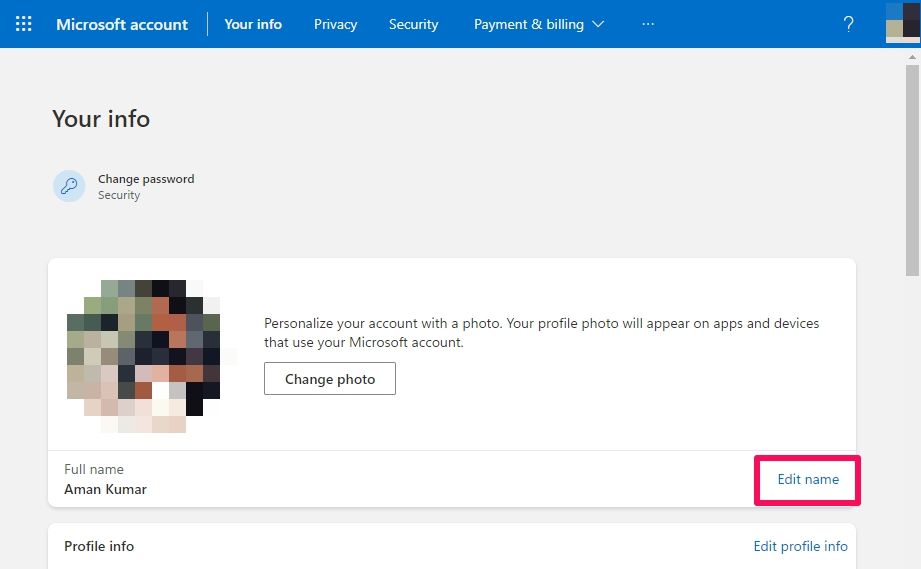
On the Microsoft account page that opens, click “Your info” in the top bar. Then, click “Edit name” under your profile picture.
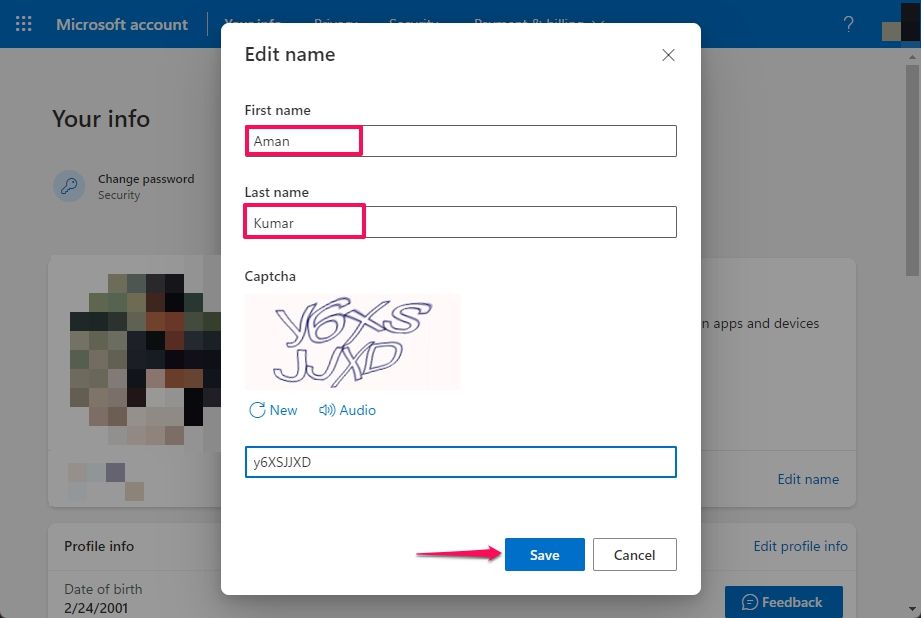
Enter your first and last name, complete the CAPTCHA to confirm that you’re a real person, and click “Save”.
That’s it! The administrator name of your computer is now changed.
2. Change the Administrator Name Using the Control Panel
The Settings app method only works if you’re logged in with a Microsoft account. If you’re using a local account , you must change the admin account name using a different method.
To do this using the Control Panel , open the Start menu and type “Control Panel” in the search field and press Enter. Change the “View by” to “Category” and navigate to User Accounts > User Accounts > Change your account name.
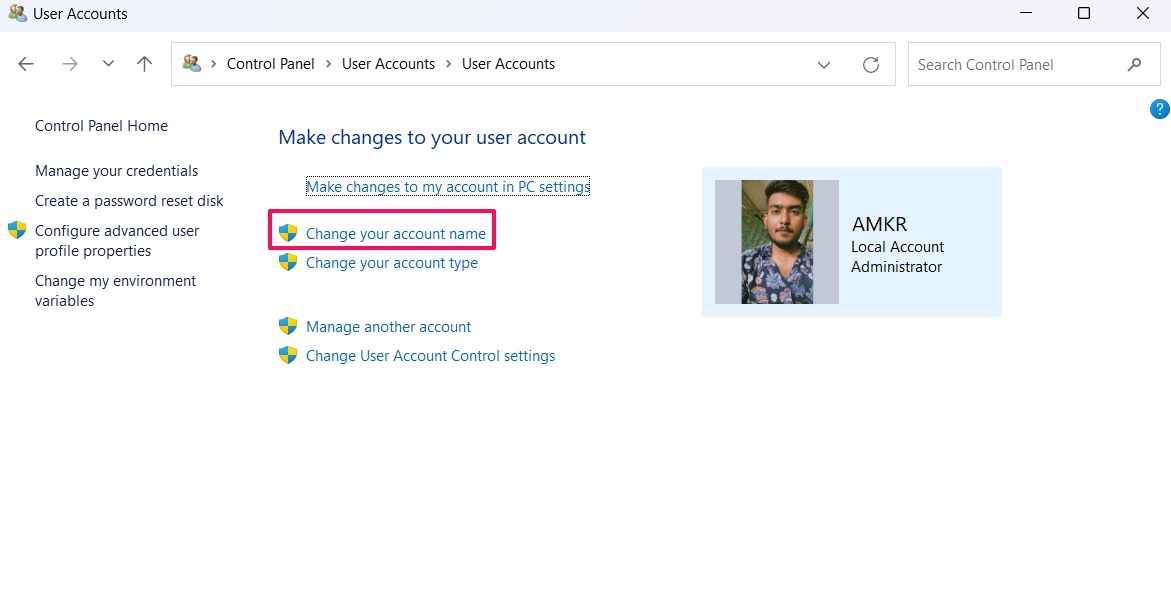
Type the new name in the “New account name” field and click “Change Name”.
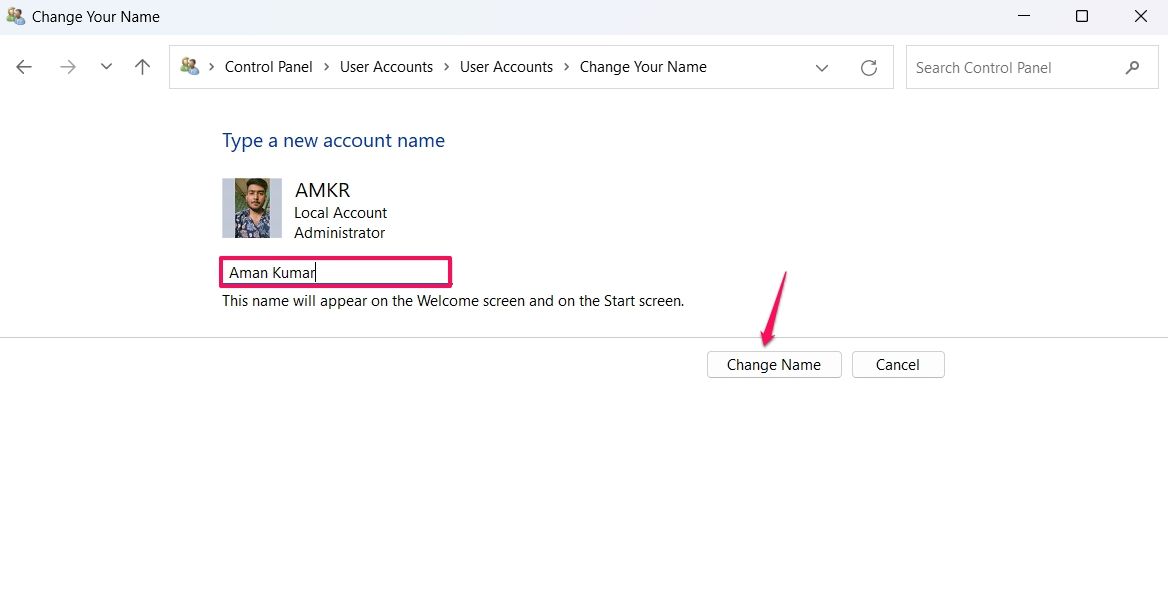
You’ll see the new name appear on the welcome screen and the Start menu.
3. Change the Administrator Name Using the Netplwiz Command
Netplwiz is a Windows command you can use to manage user accounts on your PC. It allows you to add, remove, or modify your user account. You can also use the netplwiz command to change the administrator name, as follows.
Press the Windows+R key together to open the Run tool. Then, type “netplwiz” in the search field and hit Enter.

In the User Accounts window that appears, select your account and click “Properties”.

Type the name in the “Full name” field and then click “Apply” and “OK”.
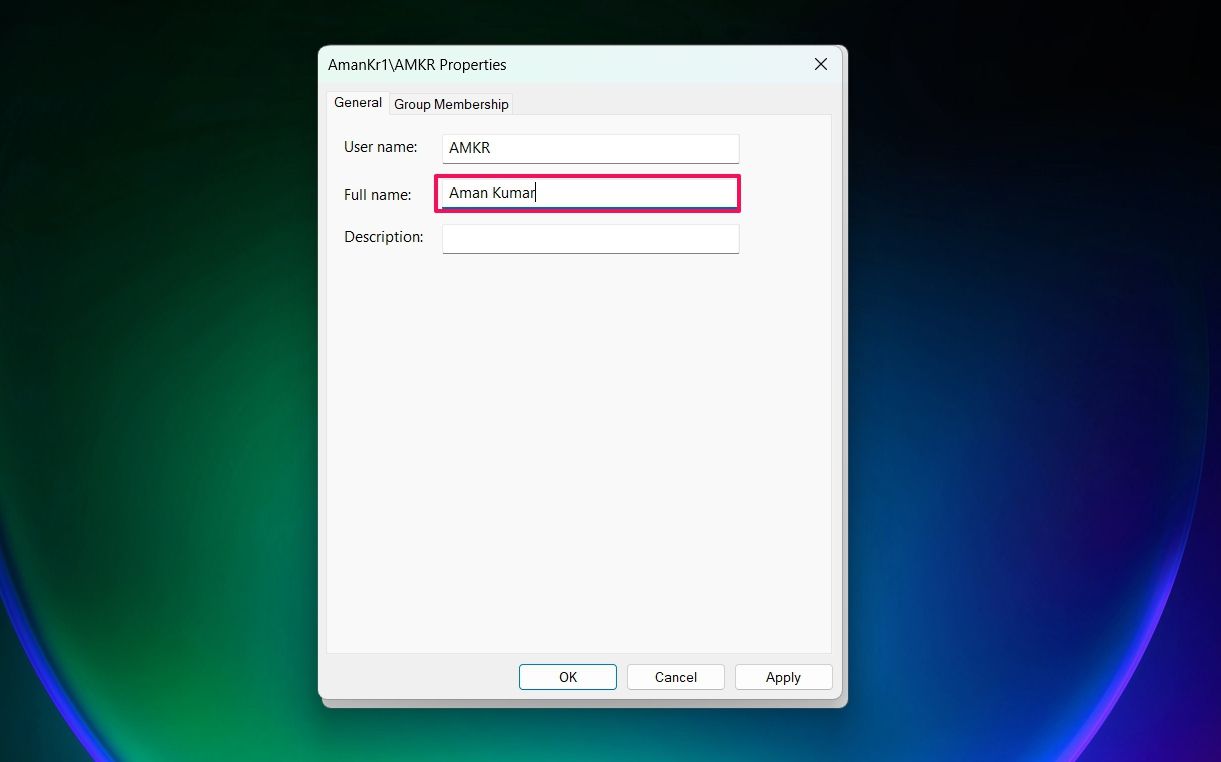
Then, you’ll have to sign out and sign back in for the changes to take effect.
4. Change the Administrator Name Using Command Prompt
If you are more comfortable using Command Prompt, you can use the wmic command to change the administrator name in Windows 11.
To begin, launch Command Prompt with elevated permissions . The quickest way to open the Command Prompt as an administrator is to search for it in the Start menu and select the “Run as administrator” option.
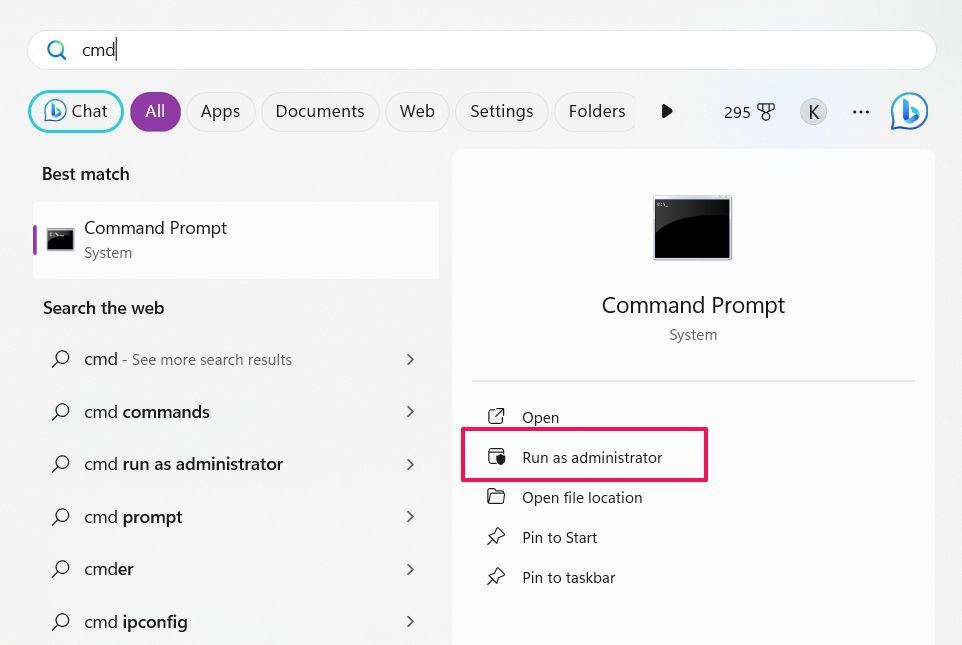
In the elevated Command Prompt window, type the following command and press Enter. This will display all the accounts on your computer.
wmic useraccount get fullname, name
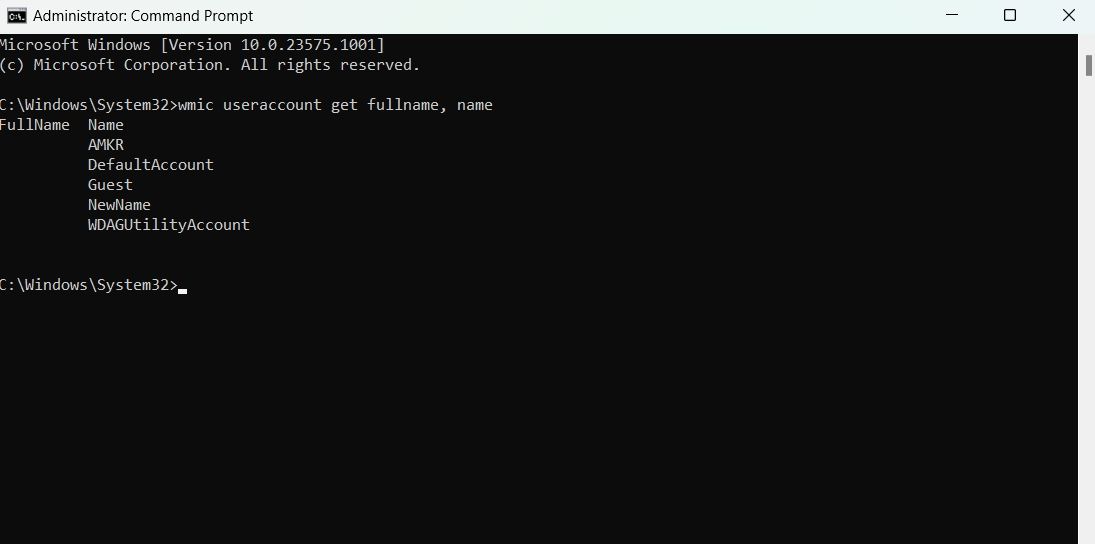
Then, type the following command and hit Enter. Make sure to replace “New Name” with the name you want to give to the administrator account.
`wmic useraccount where name="Administrator" set name="New Name"`
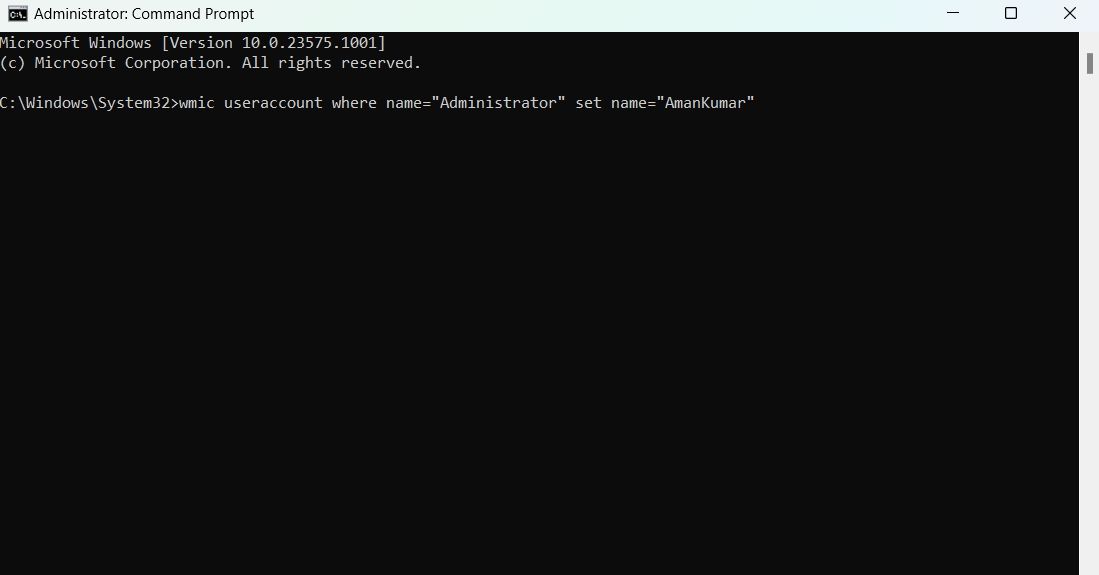
You will see the “Method execution successful” message indicating that the command ran successfully and the administrator account name is now changed.
Job done! You can change the account name as often as you like, so don’t worry if you make a mistake or change your mind.
Also read:
- [New] Top 5 Tips for TikTok Success on Mac for 2024
- [New] Unlocking Instagram's Hidden Revenue Opportunities for 2024
- [Updated] 2024 Approved Craft the Perfect Twitch Livestream Experience 5 Must-Try Methods
- [Updated] Unveiling 3D LUT Design Techniques
- Correcting d3dx9_33.dll File Absence: Best Practices and Solutions
- DIY FIX for Scan Mishaps – Top Techniques That Work Every Time
- Experience High-End Technology without Breaking Your Bank: Top Picks!
- Experience Next-Gen Viewing: Hitachi's 4K UHD TVs Featuring Integrated Roku
- Fixes and Solutions: How to Stop SnowRunner From Continuously Crashing Your PC
- How to Perform a Clean Install of Windows 11 on a New Internal Drive – A Comprehensive Guide
- How to Repair Broken video files of Samsung ?
- Magicard Rio Pro Driver: Fresh Release! Download Now for Compatible Windows Operating Systems
- Mastering Microsoft Teams with AI Assistant - The Ultimate Guide
- Mastering the Art of Integrating Google Duo with Your Gmail Experience
- Top 10 Strategies to Achieve Viral Success on TikTok
- WinX DVD製品案内と使用ガイド - Digiartyソフトウェアの最適化手引き
- Title: Update Your Username Game: How to Rename System Administrator in Windows 11 with Ease
- Author: Andrew
- Created at : 2024-12-10 09:11:42
- Updated at : 2024-12-17 01:43:50
- Link: https://tech-renaissance.techidaily.com/update-your-username-game-how-to-rename-system-administrator-in-windows-11-with-ease/
- License: This work is licensed under CC BY-NC-SA 4.0.